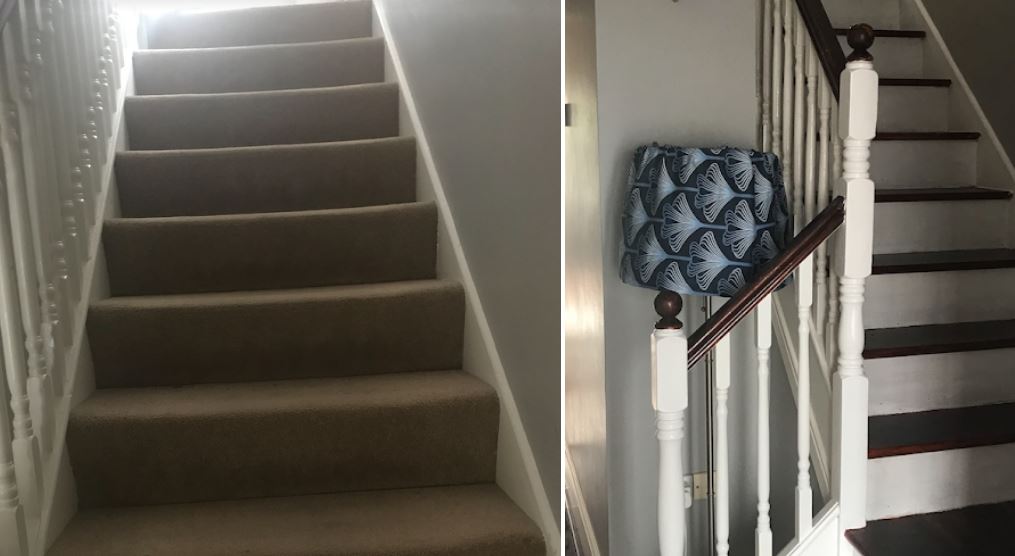
I have been dreaming for years about a stairs with no carpet.
I love that American look of the dark hardwood floor and white stair rails that you see on TV shows and films. However, with two small kids and a dog - along with a husband who hates the thoughts of doing anything new - I never got around to fulfilling my dreams until now!
With the dog having passed (RIP Coops) and children having gotten that bit older and my husband going out of the country for a few days... I seized the opportunity this week, and I pulled up the carpet on the stairs.
Now I would like to point out that I have a background in marketing; I do like to get stuck into things but have zero DIY experience or skills for that matter. YouTube and Google have been my friends in my planning and implementing this major change to our home.

Stairs with Carpet – Standard really
I never thought that I would get the reaction I did get when I put my pictures up on instagram of the transformation. Seemingly, I was not alone in wanting to rip the carpet up from the stairs! Loads of you contacted me to say you wanted to do the same thing or had done it and loved the result.
I decided that what I needed to do was to put together my tips and learnings for this project. They might be useful to someone sitting on the fence on whether they should banish the carpet from their stairs!
So here goes:

This is what you will need before you start the job:
- Energy (not joking!)
- A pair of gloves
- Hammer
- Long screwdriver
- Some screws 35mm (should be perfert to screw down squeaky boards)
- Plyers (to pull out nails and stables from the wood)
- Stanley knife
- Wood filler
- A hand sander – I rented one
- Mouth/nose cover – to protect against the dust!
- Sandpaper
- Wood stain/ paint these will all depend on the look you want
First thing to remember is that you will be starting the cutting of the carpet at the top of the stairs. You will cut the carpet just under the lip of the top step, as you will want to tuck in the carpet on the underneath step and nail it to secure it.
Then you can pull the carpet downwards from top to the bottom of the stairs.
When the carpet is removed along with the underlay, You will be left with the nails and stables which were keeping the carpet in place.
Use the Screwdriver and hammer to get under the lats and pull these up. I found that there was loads of nails and stables used to keep the underlay in place too, so I used the screwdriver and hammer to remove these too.
Next up is the fun part: sanding.

I needed to get a good course sandpaper as there were a lot of stains and marks on the wood, but I have to says it took about two hours to do it all, and it looked great when finished.

I then went about filling any holes or uneven bits in the wood. I used a standard wood filler which was recommended to me by the lads in the hardware shop. I was asking anyone who would listen for their help and advise.
The when it was all dried, I started to apply the stain, my top tip for this, is to again start at the top and then painted every second step as per the picture. It allows you to keep working back and forth on the stairs.

Then when I had the steps stained to the colour i liked, I started with the white paint on the side of the steps.


There is still bits that I need to do but I am delighted I took the job on.
The paint work needs to be tidied up in a few places and I need to paint the banisters (which I will get around to in the coming weeks) but the carpet is gone (yippee) and the house feels cleaner (to me anyway).
For those of you asking about it being noisy, the first day i did notice the noise from the wood, but 3 days in, it does not make an impact!