Preheat the oven to 200°C (180°C fan oven, 400°F, gas 6). Grease and line the base of a 25 x 38cm (10 x 15 inch) Swiss Roll tin with baking parchment.
Working on one sponge at a time, whisk 4 eggs with 75g caster sugar for 4-5 minutes until thick, pale and the consistency of lightly whipped cream.
Sift 75g flour and 25g cocoa on top. Using a large metal spoon, gently cut through and fold the ingredients together until well blended taking care not to over-mix and lose the fluffy texture.
Pile into the prepared tin. Smooth the surface and bake for 8-9 minutes until risen and just set, but not crusty.
While the cake is in the oven, lay a clean tea towel on a wire rack and lay a sheet of baking parchment on top. As soon as the sponge is cooked, turn the sponge on to the parchment, sponge-side down. Leave the tin lining paper in place, cover with another clean tea towel and leave to cool for 30 minutes.
Meanwhile, prepare the White Chocolate butter icing filling. Break up 100g white chocolate into a heatproof bowl and place over a saucepan of barely simmering water to melt. Remove from the water and leave aside to cool for 10 minutes. Meanwhile, put 150g butter in a bowl and beat until smooth and glossy. Gradually sieve and mix in 300g icing sugar to make a firm icing, then mix in the melted white chocolate, the vanilla extract and 30-45ml (2-3 tbsp) milk to make a softish, spreading icing.
Unwrap the sponge and discard the paper. Transfer to a large board and trim away a thin strip from all of the edges to remove the crust. Spread the sponge evenly with one third of the icing making sure it reaches right to the edges. Slice down the length of the sponge to make 2 equal strips.
Carefully roll up one sponge tightly like a Swiss roll – it may crack but try and roll as neatly and tightly as possible to give a good swirl effect for the centre of the cake. Lay the rolled sponge at the end of the other strip of cake and roll up to make a fat Swiss roll.
Following the same directions as above in steps 2-5, relining the tin, make and bake 2 more sponges using the remaining ingredients. Spread with icing as above and wrap around each other as described above to make a large chunky Swiss roll approx. 18cm (6inch) diameter, 10cm (4inch) deep. Transfer to a serving plate or board, and cover loosely with cling film to keep fresh and prevent from drying out. Leave in a cool place. If the room temperature is very warm, chill the cake for about 30 minutes to firm up. Prolonged chilling will dry the texture of the sponge.
Next, make the chocolate paste. Break up 100g dark chocolate into pieces and place in a heatproof bowl over a saucepan of barely simmering water to melt. Remove from the water and stir in 50g liquid glucose to form a thick paste. Scrape on to a piece of baking parchment and leave to cool – the mixture will become firm and pliable when cold. Avoid prolonged chilling as the paste will become too hard to mould.
Put the remaining white chocolate in a small heatproof bowl and melt as above. Mix in the remaining liquid glucose and leave to cool as above.
Now prepare the bark for the outside of the cake. Melt half the remaining dark chocolate as above. Remove from the water and mix well. Spread over a large upturned clean, uncoated (not non-stick) or enamel baking tray or clean board to make an oblong approx. 30 x 20cm (12 x 8inch). Tap the tray or board to smooth the chocolate and leave in a cool place for a few minutes until almost set – the surface will look dull rather than glossy but still able to retain a fingerprint when ready to use. Line another tray or board with baking parchment.
Wedge the tray or board against your torso. Using a pallet knife, hold the knife carefully at the blade tip with one hand and the handle with the other, starting at the edge of the chocolate furthest away from you, slice underneath the chocolate layer, holding the blade at a slight (20-30°) angle. As you slice through and drag the blade through the chocolate towards you, it should form a slightly curling roll up and over the knife blade. The length and thickness of the roll or curl depends on the length of time you slice the blade through the chocolate and the angle you hold the knife blade. You will need to turn the tray or board of chocolate in order to make more curls. Aim to make the chocolate curls as long as the depth of the cake – approx. 10cm (4inch).
Transfer each piece of chocolate to the lined board. Leave in a cool place to firm up until you are ready to assemble the cake. Melt the remaining dark chocolate and prepare another batch of long chocolate rolls. You will need about 40 in total.
Use the remaining butter, icing sugar, cocoa powder and milk to make up another batch of spreadable butter icing. Spread the icing all around the side of the cake to cover it. Press the dark chocolate curls on to the side of the cake to resemble bark, trimming them to fit, as necessary.
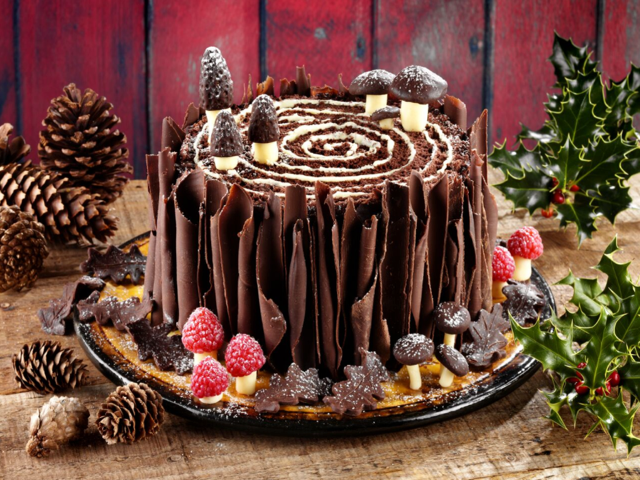
Use half of the dark chocolate moulding paste to make different sized mushroom and toadstool tops. Use the white chocolate paste to make the stalks. The tops should stick naturally to the stalks other once gently pressed together. Gently press on to and around the cake to decorate – for the mushrooms on top of the cake, push wooden cocktails sticks or dried spaghetti into the stalks to help them stand upright on the cake. Use raspberries to make red toadstool caps if preferred. The chocolate paste will become soft quite quickly as it is being shaped. If it is over-handled and becomes sticky, place in the fridge for about 30 minutes to firm up again.
For the leaves, divide the remaining dark chocolate paste into walnut-sized pieces. Flatten as much as you can with your fingers and then place between 2 sheets of clear acetate. Roll the top with a rolling pin to flatten the paste to the thickness of a €1 coin. Carefully peel the paste away from the acetate to free it, then place loosely on a sheet of baking parchment. Use a leaf cutter to cut out a leaf – we used an oak leaf cutter. The paste is pliable so once you have scored the leaves with a skewer, you should be able to bend them to make them a more 3D effect.
Gather up the trimmings to make more leaves and arrange on and around the cake. To finish, lightly dust the top of the cake with a little icing sugar. Your show-stopping cake is now ready to serve and enjoy! Note: remove cocktail sticks before slicing and serving the cake.